Host Your Own Server or Website at Home!!!
Host Your Own Server or Website at Home!!! |
Many of us actually ever wanted to make and host our own server or website at home, but we actually didn’t know how to do it. I also once thinking on hosting my own server at home so I can fully control my own server, whether in hardware or software. You can host your own website at home, and I’ll tell you exactly how everything works! However it does save little money and keeps you off brain stress if you went with online hosting services like with BlueHost. So give it serious thought before you proceed… unless your goal is simply to learn about the technology, then have fun!
The best reason to host your website at home is to learn how it all works. So here I am today explaining to you guys about this whole hosting thing.
Warning: Running a server of any kind at home is a security risk. Security problems are sometimes found in server software, and these can be exploited to gain access to or damage your files. Your computer must be kept absolutely up to date with Windows Update or the equivalent for your operating system if you intend to run a web server on it. If you choose to run Apache instead of Internet Information Server(IIS), you’ll need to keep your version of Apache absolutely up to date too. This doesn’t eliminate the risk — it only minimizes it. You run a server at home entirely at your own risk. If you do choose to run a server at home, I recommend finding an old PC on the curb and setting it up as your home server, reducing the danger to your own computer.
Web server Software List
Apache Web Server:Apache is generally recognized as the world’s most popular Web server (HTTP server). Originally designed for Unix environments, the Apache Web server has been ported to Windows and other network operating systems.
Download Link: http://mirror.uoregon.edu/apache//httpd/binaries/win32/httpd-2.2.22-win32-x86-openssl-0.9.8t.msiApache Tomcat:
The Apache Tomcat has been developed to support servlets and JSP scripts. Though it can serve as a standalone server, Tomcat is generally used along with the popular Apache HTTP web server or any other web server. Apache Tomcat is free and open source
Download Link: http://mirror.nyi.net/apache/tomcat/tomcat-7/v7.0.26/bin/apache-tomcat-7.0.26.exe
WampServer:
WampServer is a Windows web development environment. It allows you to create web applications with Apache2, PHP and a MySQL database.
Download Link: Download Here
Microsoft IIS Windows Web Server
IIS Windows Web Server has been developed by the software giant, Microsoft. It offers higher levels of performance and security than its predecessors. It also comes with a good support from the company and is the second most popular server on the web.It comes installed on your windows os.
Check how to setup IIS here:
Here are the steps to follow to set up a website[windows]
I will introduce a Brief walkthrough on what exactly
you have to do and then I will talk about all the things that I have
mentioned in detail.
**Procedures for other operating systems are similar, and
most of these steps actually involve your router, so this article should
still be helpful to non-Windows users.1. Make sure you have cable modem, DSL or another high-speed connection. A dialup telephone modem is NOT good enough.
2. Get a DNS hostname for your home Internet connection.
3. Get a static local IP address for your computer within your home network.
4. Configure your router to correctly forward connections on port 80 (the HTTP port) to your web server. If your ISP blocks port 80, choose an alternative port number and forward that.
5. Configure Windows Firewall to allow your web server to communicate on port 80.
6. Get Apache, a free, high-quality web server program. If you have Windows XP Professional, you also have the option of Microsoft Internet Information Server (IIS), which comes standard with Windows XP Professional. But that option only allows you to host one site. I recommend Apache or WAMP.
7. Test your web server from your own computer.
8. Replace the default home page with your own web page. Now the site is your own!
9. Test your web server from a computer that is NOT on your home network to make sure you followed all of the steps correctly.(like go to a cyber cafe and test your website)
Detailed Version
Step One in Detail: Broadband
Get cable modem (from the cable company like ZUKU in Kenya) or DSL (from the phone company and various other companies like BSNL in
India). If you can’t do that, you’ll have to host your website in some
other way. Your computer must have a fast connection to grapple with
video and audio files or heavy images that you may strap onto you site. Upload speed, is the most important feature for hosting websites at home. That means no need to worry a lot on download speed.
Step Two in Detail: Dynamic or Static DNS
Other people can’t access your website if they don’t know the
address… and if you have a typical cable modem or DSL connection, your
address changes often. You can solve this problem by using a dynamic DNS
service. Even if your IP address doesn’t change, you still need someone
to host a DNS server for you, unless you are willing to put up with
giving users a URL that begins with a string of numbers.
Step Three in Detail: A Static Local IP Address
If you have a router… and you do, if you have WiFi (wireless access)
or more than one computer… then your computer receives a new local
address on your home network, or Intranet, every time it is powered on.
But to forward web browser connections to your computer, you need an
unchanging address to forward those connections to.
Step Four in Detail: Forwarding Port 80
If you don’t have a router then go buy one coz it is very useful
while hosting websites at home. If you have WiFi, or more than one
computer, you definitely have a router and must not skip this step.If you have a static local IP(IP address that doesn’t change.(Fixed IP address)) for your computer, you’re ready to configure the router to forward web traffic to your computer. If you have a Dynamic IP(IP address that Changes), don’t worry coz you can still port forward your port 80.
Step Five in Detail: Allowing Web Traffic Through The Firewall
Yes, your router serves as a firewall, but your computer also has a
built-in firewall. You’ll need to configure that firewall to allow
traffic through on port 80 to reach your web server software.
Step Six: Get Apache Or Internet Information Server Or WAMP
Apache is the most popular web server in the world, Why is it so
popular? Because it’s free, open-source, high-quality software. And you
can run it on your Windows station at home!Check the list below to see whether IIS is preinstalled on your system or not.
- IIS 1.0, Windows NT 3.51 available as a free add-on
- IIS 2.0, Windows NT 4.0
- IIS 3.0, Windows NT 4.0 Service Pack 2
- IIS 4.0, Windows NT 4.0 Option Pack
- IIS 5.0, Windows 2000
- IIS 5.1, Windows XP Professional and Windows XP Media Center Edition (requires retail CD)
- IIS 6.0, Windows Server 2003 and Windows XP Professional x64 Edition
- IIS 7.0, Windows Server 2008 and Windows Vista (Home Premium, Business, Enterprise and Ultimate editions)
- IIS 7.5, Windows Server 2008 R2 and Windows 7 (Home Premium, Professional, Enterprise and Ultimate editions)
**By the way, Mac and Linux users: you already have Apache!. Linux users: install the Apache packages and look in/var/www/html or a similar location for your website folder.
Step Seven: Test Your Website From Your Own Computer
Let us check if the website is working or not. The first test is to access your site from your own computer. (Make sure your server is running that is Apache or IIS or Wamp are switched on). Test the website On the same computer that is running the web server software, access the URL http://localhost/.
You should see an example home page provided with your web server
software. If not, try checking server guide or help section of the web
server software. If you received errors during installation, you need to
resolve them before your website will work.
Step Eight: Make Your Own Home Page
You have a web server, but right now the “content” on the site is
just the default home page that came with the server software. Time
change that!All you have to do is move your own web pages like the “index.html” file and all the necessary website file to the appropriate folder.
If you followed the Apache quick-start guide, your web pages belong in this folder:
C:\Program Files\Apache Group\htdocs
If you have WAMP then,your web pages belong in this folder:
c:\wamp\www
If you followed the IIS quick-start guide, your web pages belong here:
C:\Inetpub\wwwroot
First, remove the files that are already in those folders. It’s not smart to leave “default” files lying around. What if a security problem was found with one of these common files? Then your website would be vulnerable.
Next, copy your own web pages and images into the folder. The “home page” of your site should be called index.html(not index.htm). The web servers are smart enough to know that when a user visits http://yourname.is-a-d.com/, they should act as if the user asked for http://yourname.is-a-d.com/index.html and do the right thing.
Step Nine: Test Your Website From The Outside World
Is my website now on the World wide web? Only one way to be sure! Access your website from a computer that is noton your home Internet connection, or have a friend try accessing your website.
Installation Details and How to?
Apache web server Installation Guide
Downloading Apache
Visit this link to download Apache HTTP Web Server.
The download will automatically begin. This link is for Direct
Download. Wait for the download to finish. The MSI installer is a
6.065MB download.
Installing Apache
Once the download is complete, you’re ready to install the software. Double-click on the file you just downloaded.First you’ll see the “Welcome to the Installation Wizard” page. Click “Next” to continue.
Next, you’ll see the Apache license agreement. The Apache license allows you to share the software freely, including the source code. Select “I accept the terms in the license agreement” and click “Next.”
The “Read This First” page appears. Currently this page doesn’t offer much specific information for Windows users of Apache. Click “Next.”
The “Server Information” page should now appear. Be sure to enter the correct information:
1. For “Network Domain,” if you registered a hostname such as myname.made-up.com with a dynamic DNS service likefreedns.afraid.org, enter just the domain name portion (made-up.com).
2. For “Server Name,” enter your full hostname, such as myname.made-up.com.
3. For “Administrator’s Email Address,” enter a real email address for you that actually works. Users will see this when things go wrong. Bear in mind that spammers might discover this address, so use an address that is already publicly known if possible.
4. For “Install Apache HTTP Server 2.0 programs and shortcuts for…” select “for All Users, on Port 80, as a Service.” This ensures that the software is always running, no matter who is sitting down at your computer. And a website that is not always running is not very useful! So pick this option and click “Next.”
The “Setup Type” page appears next. Select “Typical” and click “Next” to move on.
You’ll see the “Destination Folder” page. By default, Apache installs in the folder C:\Program Files\Apache Group, creating a sub-folder called C:\Program Files\Apache Group\htdocs to keep your web pages in. These are good choices, so click “Next.” Don’t click “Change…” unless you know exactly what you’re doing.
Finally, the “Ready to Install the Program” page appears. Click “Install” to kick off the installation process. The Apache server software will be copied into place and the Apache service will start up in the background. Along the way, a few Windows Command Prompt windows will flash up briefly. This is normal and you should let these windows do their thing and go away on their own!
Internet Information Server Installation Guide
For windows XP1. Make sure you have Windows XP Professional! Click “Start,” then right-click “My Computer.” Choose “Properties” from the menu that appears. The “General” tab will appear. Under “System:” you should see “Microsoft Windows XP Professional.” If you see Windows XP Home, Windows ME, Windows 98 or Windows 95, you will not be able to use IIS. Follow the Apache Quick-Start Guide instead.
2. We’re ready to install the IIS software. Select “Start,” then “Control Panel,” then “Add/Remove Programs.” Select “Add/Remove Windows Components” from the left-hand column.
A list of available Windows features appears. Check the box for “Internet Information Services (IIS)” and click “Next.” If prompted, insert your Windows XP installation CD.
That’s all it takes! Installing IIS is very simple because it is a standard component of Windows XP Professional.
For windows 7 and Windows Vista
Check this Microsoft website IIS site for Instructions.
Wamp Server Installation Guide
Downloading Wamp
Visit this link to download Wamp Web Server.
The download will automatically begin. This link is for Direct
Download. Wait for the download to finish. The MSI installer is a
24.48MB download.
Installing Wamp
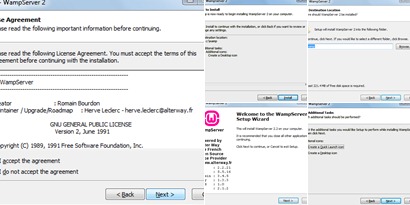
Once the download is complete, you’re ready to install the software. Double-click on the file you just downloaded.First you’ll see the “Welcome to the WampServer 2 Setup Wizard” page. Click “Next” to continue.
Next, you’ll see the Wamp license agreement. The Wamp license allows you to share the software freely, including the source code. Select “I accept the agreement” and click “Next.”
You’ll see the “Select Destination Folder” page. By default, Wamp installs in the folder C:\wamp, creating a sub-folder called C:\wamp\www to keep your web pages in. These are good choices, so click “Next.” Don’t click “Browse” to change the directory, unless you know exactly what you’re doing.
Next, you’ll see the “Select Additional Tasks” page appears. Here you can select to “Create a Desktop Icon” or “ Create a Quick Launch Icon”. Those are your choice. After that click “Next”.
Finally, the “Ready to Install” page appears. Click “Install” to kick off the installation process. Restart If necessary after all the Installation process is over.
Port Forwarding Port 80 [Everything]
Port forwarding Port 80 in your Modem settingsPort Forwarding Steps for the BEETEL Modem
1. Log into your router. Usually the URL is http://192.168.1.1/ and the password is what you chose when you first set it up. Consult the manual if you have never set it up before or need to reset the password.2. Choose “Advanced Setup”
3. Choose “NAT” (Network Address Translation)
4. Choose “Virtual Server”
5. Add an entry like in the image shown
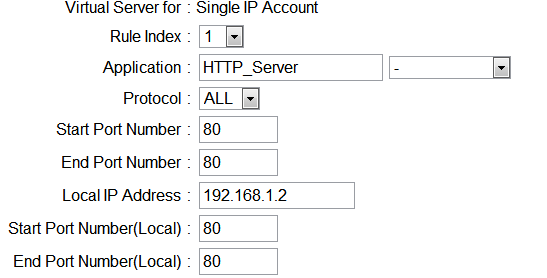
6. Click “Save” which is situated below some table. Forwarding should begin immediately.
Opening Ports in Windows Firewall
To open port 80 in Windows Firewall check this site for instructions. On Windows, with Microsoft Windows Firewall software, follow these instructions. Similar procedures can be followed on Mac OS or Linux, or with other firewall programs for Windows. See the documentation for your operating system or software
http://msdn.microsoft.com/en-us/library/bb934283.aspx
For Windows XP
http://support.microsoft.com/kb/841549
Allow Web servers to communicate through Windows Firewall in Windows 7
- Open Windows Firewall by clicking the Start button, clicking Control Panel, clicking Security, and then clicking Windows Firewall.
- In the left pane, click Allow a program through Windows Firewall. If you are prompted for an administrator password or confirmation, type the password or provide confirmation.
- Click On Change settings button on the top right
- Select the check box next to the program you want to allow, and then click OK.
- If you don’t find the web server software for E.g: “start WampServer” click on the “Allow another program…” button which is located at the bottom right. After clicking on that, a small window will open with a list of programs that you have installed on your system. Find the web server software in my case its Wamp server. After finding it on the list select the software and click on “ADD”


Running Only One Webserver
Running more than one server for E.g: Apache and IIS.
is not ideal. This may bring in lots of unwanted problems, which I don’t
want you all to suffer.
Usually Internet Information Server (IIS) in most
Operating systems of windows is enabled by default. Now when you install
your Apache or any other web server. The two servers get tangled, and http://localhost/ starts
displaying IIS homepage instead of Apache and then you will start
smashing keyboard and monitors and cycle of events continue.
Now to stop that from happening, You need to disable
the IIS in services and enable your webserver. Here are the instructions
to do exactly that.
open Services from the Search box- Click Start.
- In the Start Search box, type services and press ENTER.

Right Click on “IIS Admin Service” and select properties

In Properties window Select “Startup type” as “Disabled” and then click “OK”
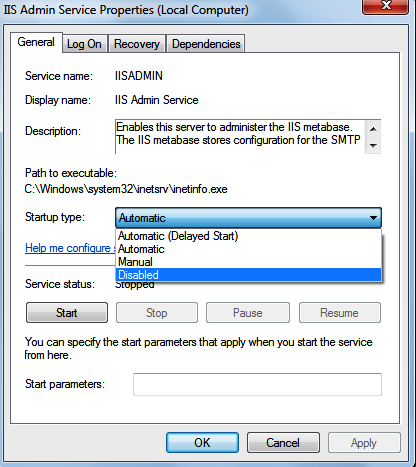
Don’t close services After Disabling the IIS, your next job is to enable your web server. So search again for your web server. In my case it is Wamp so this is how it will look in services

Now, as you can see I have two Wamp that is “wampapache” and “wampmysqld” what you need to do now is select the first one that is “wampapache” and then click on “ ’Start’ the service ” that’s it. Repeat that for both If you are using WAMP. If you are using any other like apache then find apache and its family with the similar name and do the same, click on start for all and Do not forget to check on “Startup Type”. Always set your “Startup Type” to “Automatic” for your webservers.

How to get a Free Domain name?
You can get a URL using dynamic DNS services like http://dyndns.com, http://no-ip.com, http://dyn.com,http://freedns.afraid.org.I recommend http://freedns.afraid.org
- Register a account in their site.
- After registration verify your account
- Login to your account
- Go to Subdomains
- Click on “Add a Subdomain”
- Add the details in the form
- In subdomain add your name for the site
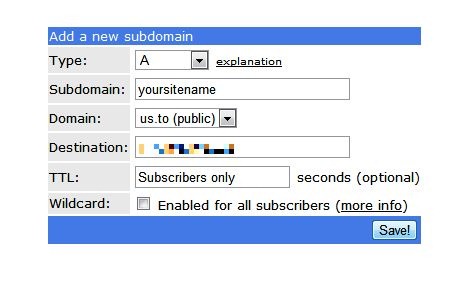
- Domain select your choice
- Destination is your IP address and is added automatically so don’t worry on that.
- Click on Save!
How to get a paid Domain name?
Well, There are many sites online that let you buy domain names and help you host your site. Sites likehttp://godaddy.com, http://hostmonster.com, http://hostgator.com/ .
Dynamic IP, what should I do?
Well, You don’t need to worry If you have a dynamic IP
address(IP address that keeps changing). It is always better to have a
static IP(Fixed IP address). The Reasons for this is…Well..I don’t
know.. Check google.
If you have a Dynamic IP then you will require to run a
small program on your computer/server to watch over when your IP
changes & when it does change, The software updates the domain name
to that changed IP.
You can find these software, which are know by name
Dynamic DNS clients. You can check out the list of them by going to this
link below.
These clients that are there are for domains that are registered on http://freedns.afraid.org. If you registered your domain in some other site then they will have their own clients. You can download those and run them.
Congratulations!
Felicitation! You have your own website on the Internet, hosted entirely at your own home. Just a reminder: your computer and your router or the Internet must remain on, and connected to the Internet, all the time.Without
a web server, there’s no website. That’s why, if you choose to host at
home, I recommend picking up an older computer, installing in at least
128MB of RAM and firing it up as a web server. If security problems are
found in the web server, they are more likely to be confined to the less
important computers.Post by: microcybersoft.wordpress.com


Post a Comment